yum安装k8s kubeadm初始化方式
主机节点准备
所有节点
主机名配置
$ hostnamectl set-hostname xxx主机名与IP地址解析 (hosts)
$ vi /etc/hosts

xxx.xxx.xxx.xxx k8s-master01
xxx.xxx.xxx.xxx k8s-master02
xxx.xxx.xxx.xxx k8s-master03
xxx.xxx.xxx.xxx k8s-node01
xxx.xxx.xxx.xxx k8s-node02
xxx.xxx.xxx.xxx k8s-node03
...
防火墙配置
$ systemctl stop firewalld
$ systemctl disable firewalld
# 或
$ systemctl disable --now firewalld

$ firewall-cmd --state   # 输出“not running”
SELINUX配置
需要重启服务器
$ sed -ri 's/SELINUX=enforcing/SELINUX=disabled/' /etc/selinux/config
$ sestatus
内核升级
k8s版本越高对内核的要求越高,比如Kubernetes v1.32.7要求的内核版本是4.19(LTS版本)或任何5.x、6.x版本
下载
https://mirrors.coreix.net/elrepo-archive-archive/kernel/el7/x86_64/RPMS/
# 选择kernel-lt、kernel-lt-tools、kernel-lt-tools-libs下载
kernel-lt-5.4.278-1.el7.elrepo.x86_64.rpm
kernel-lt-tools-5.4.278-1.el7.elrepo.x86_64.rpm
kernel-lt-tools-libs-5.4.278-1.el7.elrepo.x86_64.rpm

# 下载
$ wget https://mirrors.coreix.net/elrepo-archive-archive/kernel/el7/x86_64/RPMS/kernel-lt-5.4.278-1.el7.elrepo.x86_64.rpm
$ wget https://mirrors.coreix.net/elrepo-archive-archive/kernel/el7/x86_64/RPMS/kernel-lt-tools-5.4.278-1.el7.elrepo.x86_64.rpm
$ wget https://mirrors.coreix.net/elrepo-archive-archive/kernel/el7/x86_64/RPMS/kernel-lt-tools-libs-5.4.278-1.el7.elrepo.x86_64.rpm
删除卸载之前的内核工具依赖包,同时会自动根据依赖关系卸载内核工具包
$ yum remove kernel-tools-libs.x86_64 kernel-tools-libs.x86_64 -y安装
$ rpm -ivh kernel-lt-5.4.278-1.el7.elrepo.x86_64.rpm \
  kernel-lt-tools-5.4.278-1.el7.elrepo.x86_64.rpm \
  kernel-lt-tools-libs-5.4.278-1.el7.elrepo.x86_64.rpm
更新 grub 引导菜单
# 将新内核设为默认(替换 X 为输出中的序号,通常是 0)
$ grub2-set-default X
# 更新 GRUB 配置
$ grub2-mkconfig -o /boot/grub2/grub.cfg
# 重启
$ reboot
# 查看内核
$ uname -r
时钟同步
根据自己情况选择,生产环境最好配上
$ timedatectl
$ yum install -y chronyd    # 安装
$ systemctl status chronyd
配置内核路由转发及网桥过滤
# 添加网桥过滤及内核转发配置文件
$ cat > /etc/sysctl.d/k8s.conf << EOF
net.bridge.bridge-nf-call-ip6tables = 1
net.bridge.bridge-nf-call-iptables = 1
net.ipv4.ip_forward=1
EOF
参数 说明 net.bridge.bridge-nf-call-ip6tables 控制桥接的 IPv6 流量是否经过 ip6tablesnet.bridge.bridge-nf-call-iptables 控制桥接的 IP 流量是否经过 iptablesnet.ipv4.ip_forward 用或禁用 Linux 系统对 IPv4 数据包的转发能力 net.ipv4.ip_forward_use_pmtu 控制 Linux 内核在转发 IPv4 数据包时是否使用 路径 MTU 发现 net.bridge.bridge-nf-call-arptables 是否允许桥接设备(Bridge)的 ARP 流量经过 arptables规则处理
# 加载br_netfilter
$ modprobe br_netfilter# 查看是否加载
$ lsmod | grep br_netfilter
# 运行输出:
br_netfilter 22256 0
bridge 151336 1 br_netfilter# 临时启用 IPv4 数据包转发功能
$ echo 1 > /proc/sys/net/ipv4/ip_forward
# 激活配置
$ sysctl --system安装ipset及ipvsadm
[可选] 生产建议安装
安装
$ yum -y install ipset ipvsadm配置ipvsadm模块加载方式
# 添加需要加载的模块
$ cat > /lib/modules/ipvs.modules << EOF
#!/bin/bash
modprobe -- ip_vs
modprobe -- ip_vs_rr
modprobe -- ip_vs_wrr
modprobe -- ip_vs_sh
modprobe -- nf_conntrack
EOF
授权、运行、检查是否加载
$ chmod 755 /lib/modules/ipvs.modules && bash /lib/modules/ipvs.modules && lsmod -e ip_vs -e nf_conntrack
# 运行输出:
Usage: lsmod
禁用swap分区
注意:建议永久关闭,否则配置k8s过程中可能会出现很多错误
容器化场景推荐使用真实物理内存,如果使用虚拟交换分区,无法限制使用量
# 临时关闭
$ swapoff -a

# 注释掉下面的设置(永久关闭)
$ vi /etc/fstab
/dev/mapper/centos-swap swap

# 确认关闭:若swap行都显示 0 则表示关闭成功
$ free -m
容器管理工具安装与配置
Containerd、Docker、Podman选其一即可,但是需要先使用
yum 或 dnf remove podman container*移除系统自带的容器管理工具
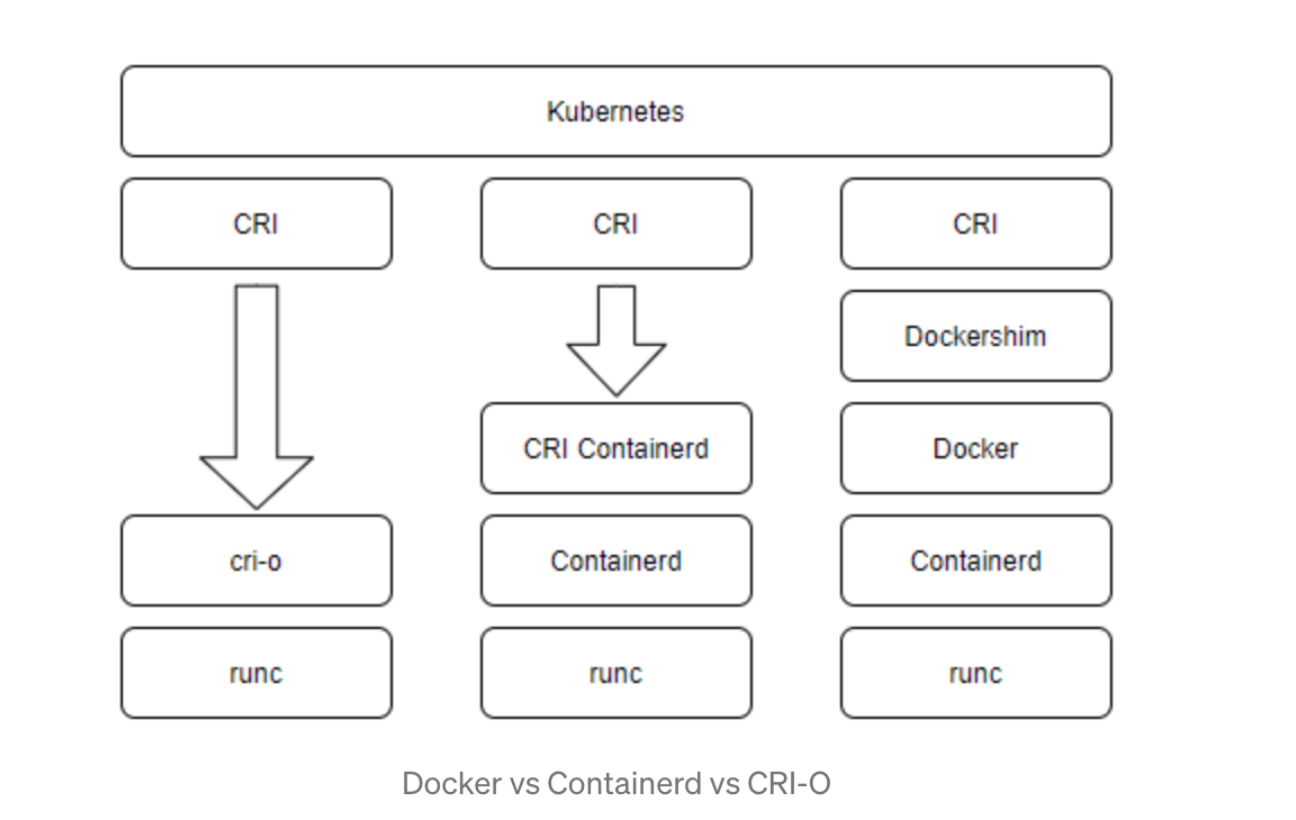
Containerd
部署文件获取
注意:Containerd 1.x 与 2.x 下载的安装包不一样
2.x 需要单独安装runc,安装runc之后才能生成配置文件、修改、启动
下载指定版本Containerd
# amd64
$ wget https://github.com/containerd/containerd/releases/download/v1.7.28/cri-containerd-1.7.28-linux-amd64.tar.gz
# arm64
$ wget https://github.com/containerd/containerd/releases/download/v1.7.28/cri-containerd-1.7.28-linux-arm64.tar.gz
解压安装
containerd 2.0.0+版本不要使用这种方式,这种方式会直接替换掉
/bin目录下的所有二进制文件
# amd64
$ tar -zxf cri-containerd-1.7.28-linux-amd64.tar.gz -C /
# arm64
$ tar -zxf cri-containerd-1.7.28-linux-arm64.tar.gz -C /
Containerd配置文件修改并修改
创建配置文件目录
$ mkdir /etc/containerd生成配置文件
$ containerd config default > /etc/containerd/config.toml修改pause信息[可选]
$ vi /etc/containerd/config.toml
# 编辑sandbox_image
sandbox_image = "registry.k8s.io/pause:3.8"  # 3.8改成3.10  也可以修改为国内的代理

stemdCgroup = false  # 由false修改为true
Containerd启动及开机自启动
设置开机自启动并现在启动
$ systemctl enable --now containerd验证版本
$ containerd --version
$ runc --version   # runc 注意libseccomp的版本最好在2.5.0+版本, 过低尝试升级内核等方式将其升起来
$ which runc containerd
runc报错
bash$ runc --version runc: symbol lookup error: runc: undefined symbol: seccomp_notify_respond方案1:
Centos7系列用不到,因为Centos7最高的版本就是2.3.1,Centos7参考:方案2
bash$ yum install libseccomp-devel -y方案2:通过
centos 8-stream的安装包将其升级
centos7中yum下载的版本是2.3的版本,不满足最新containerd的需求,需要下载2.4以上的bash# 卸载原来的 $ rpm -qa | grep libseccomp # 输出示例 libseccomp-devel-2.3.1-4.el7.x86_64 libseccomp-2.3.1-4.el7.x86_64 # 卸载 $ rpm -e libseccomp-devel-2.3.1-4.el7.x86_64 --nodeps $ rpm -e libseccomp-2.3.1-4.el7.x86_64 --nodeps下载高于2.4以上的包
bash$ wget http://mirrors.aliyun.com/centos/8-stream/BaseOS/x86_64/os/Packages/libseccomp-2.5.2-1.el8.x86_64.rpm安装
bash$ rpm -ivh libseccomp-2.5.2-1.el8.x86_64.rpm # 或 $ yum install -y libseccomp-2.5.2-1.el8.x86_64.rpm # 查看当前版本 $ rpm -qa | grep libseccomp # 此时使用runc就不会报错了方案3:[如果方案1也不行] 可能系统的 runc 与 libseccomp 不兼容,可以从runc官方下载静态链接的二进制文件,并替换现有的 runc
https://github.com/opencontainers/runc
bash$ wget https://github.com/opencontainers/runc/releases/download/v1.3.0/libseccomp-2.5.6.tar.gz # 安装编译依赖 $ yum install -y gcc gperf $ tar zxf libseccomp-2.5.6.tar.gz; cd libseccomp-2.5.6 $ ./configure # ./configure --prefix=/usr/local $ make & make install 更新动态库缓存 $ ldconfig # 验证安装 $ ldconfig -p | grep libseccomp
Docker
先安装docker再安装cri-dockerd,不然cri-dockerd起不起来
二进制安装
下载
$ wget https://download.docker.com/linux/static/stable/x86_64/docker-28.3.3.tgz安装
$ tar -xf docker-28.3.3.tgz
# chmod +x docker/*
$ cp docker/* /usr/bin/
启动docker服务
$ cat > /usr/lib/systemd/system/docker.service << EOF
[Unit]
Description=Docker Application Container Engine
Documentation=https://docs.docker.com
After=network-online.target firewalld.service
Wants=network-online.target

[Service]
Type=notify
ExecStart=/usr/bin/dockerd
ExecReload=/bin/kill -s HUP $MAINPID
LimitNOFILE=infinity
LimitNPROC=infinity
LimitCORE=infinity
TimeoutStartSec=0
Delegate=yes
KillMode=process
Restart=on-failure
StartLimitBurst=3
StartLimitInterval=60s

[Install]
WantedBy=multi-user.target
EOF$ systemctl enable --now docker修改cgroup方式
/etc/docker/daemon.json 默认没有此文件,需要单独创建
$ mkdir /etc/docker
# 以下视情况而定[非必须],最新(如26.0.0+)的docker中cgroupdriver默认为systemd
$ cat > /etc/docker/daemon.json << EOF
{
  "exec-opts": ["native.cgroupdriver=systemd"]
}
EOF$ systemctl restart docker添加docker用户组
$ groupadd docker
$ usermod -aG docker root
cri-dockerd安装
k8s 1.24+需要
尽量不要使用低版本,最好在3.0.0+
tgz包安装
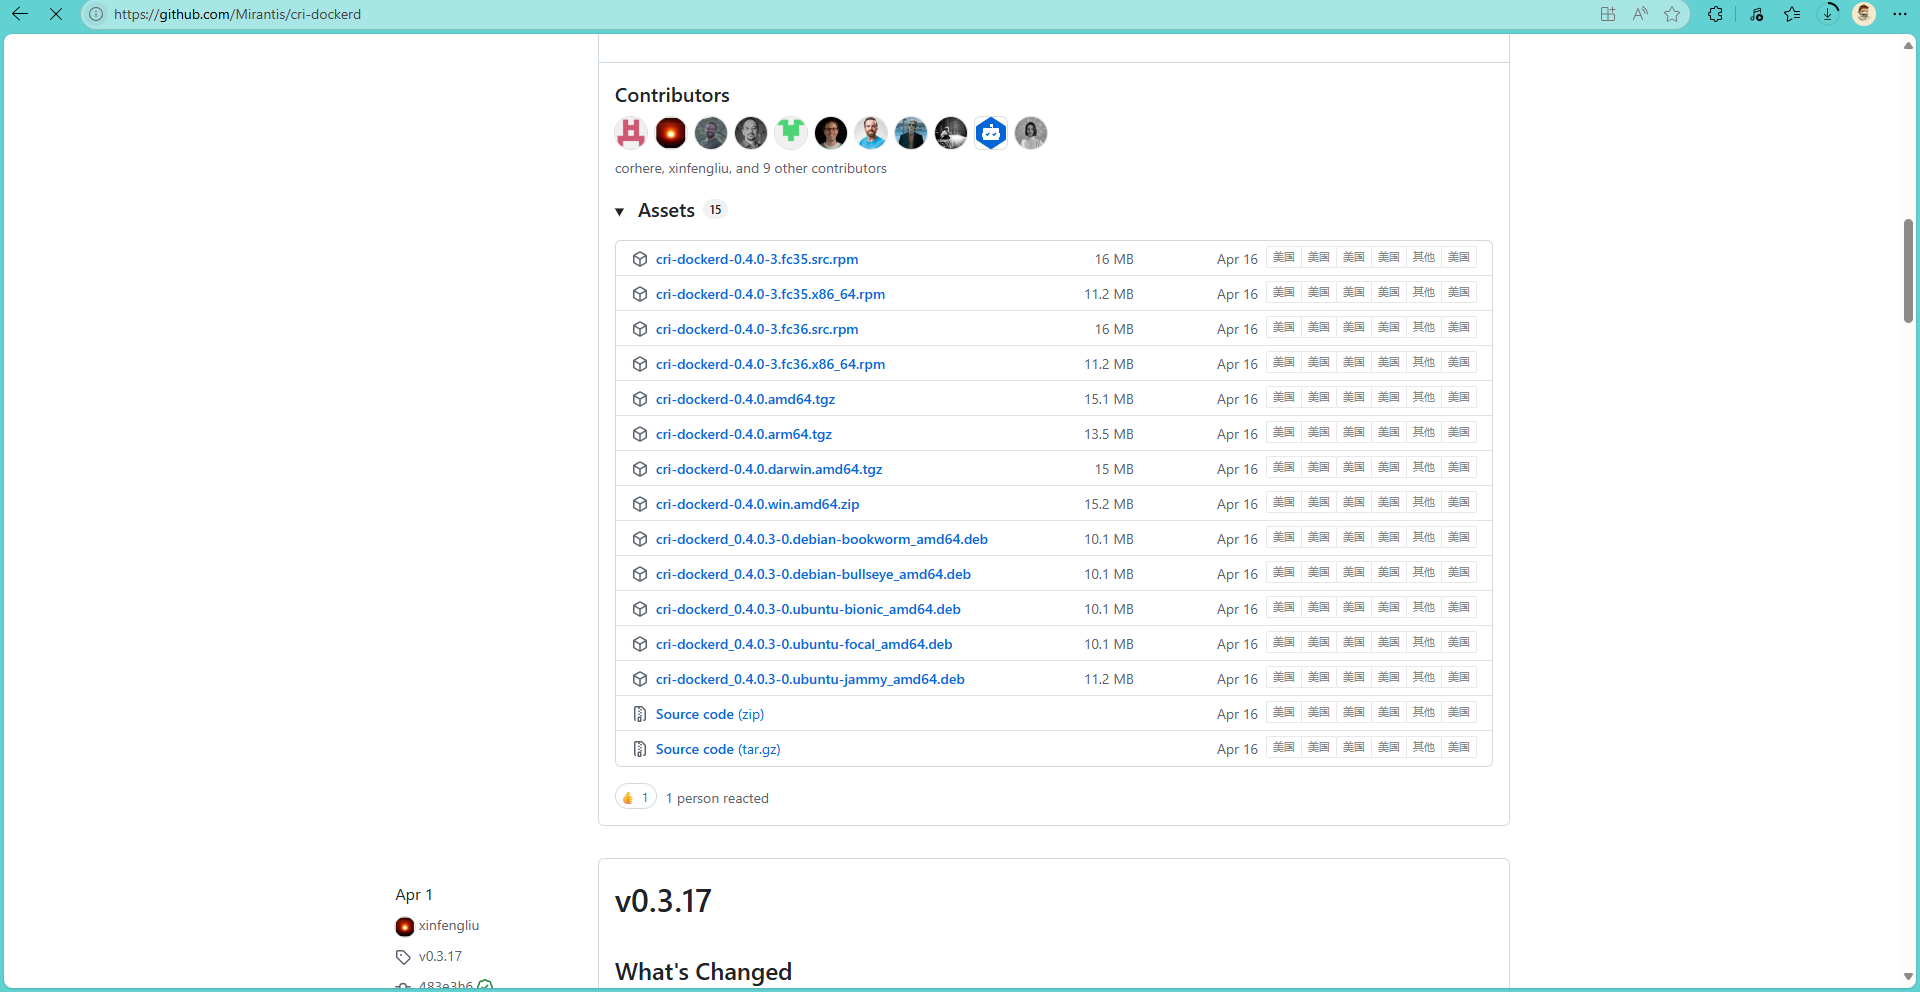
$ wget https://github.com/Mirantis/cri-dockerd/releases/download/v0.4.0/cri-dockerd-0.4.0.amd64.tgz
$ wget https://github.com/Mirantis/cri-dockerd/releases/download/v0.4.0/cri-dockerd-0.4.0.arm64.tgz

$ tar -zxf cri-dockerd-0.4.0.amd64.tgz
$ mv cri-dockerd/cri-dockerd /usr/local/bin/
配置systemd
官方文件地址:https://github.com/Mirantis/cri-dockerd/blob/master/packaging/systemd/cri-docker.service
由于cri-dockerd一个二进制文件,现在需要把cri-dockerd作为一个系统启动服务的话,就需要编写cri-docker.service 文件,以便cri-dockerd能被纳入systemd维护中,以及 cri-docker.socket文件,此cri-docker.socket 文件实际上是一个 systemd socket unit 文件,这个文件定义了 systemd 如何管理一个特定的 Unix 域套接字,以便在有连接请求时启动相应的服务.
$ cat > /usr/lib/systemd/system/cri-docker.service << EOF
[Unit]
Description=CRI Interface for Docker Application Container Engine
Documentation=https://docs.mirantis.com
After=network-online.target firewalld.service docker.service
Wants=network-online.target
# 注意这个
Requires=cri-docker.socket

[Service]
Type=notify
ExecStart=/usr/local/bin/cri-dockerd --network-plugin=cni   --pod-infra-container-image=registry.k8s.io/pause:3.10 --container-runtime-endpoint fd://
ExecReload=/bin/kill -s HUP $MAINPID
TimeoutSec=0
RestartSec=2
Restart=always
# /usr/local/bin/cri-dockerd        [这个就是你放cri-dockerd执行文件的地方]
# mage=registry.k8s.io/pause:3.10   [自己根据实际情况填写]

# Note that StartLimit* options were moved from "Service" to "Unit" in systemd 229.
# Both the old, and new location are accepted by systemd 229 and up, so using the old location
# to make them work for either version of systemd.
StartLimitBurst=3

# Note that StartLimitInterval was renamed to StartLimitIntervalSec in systemd 230.
# Both the old, and new name are accepted by systemd 230 and up, so using the old name to make
# this option work for either version of systemd.
StartLimitInterval=60s

# Having non-zero Limit*s causes performance problems due to accounting overhead
# in the kernel. We recommend using cgroups to do container-local accounting.
LimitNOFILE=infinity
LimitNPROC=infinity
LimitCORE=infinity

# Comment TasksMax if your systemd version does not support it.
# Only systemd 226 and above support this option.
TasksMax=infinity
Delegate=yes
KillMode=process

[Install]
WantedBy=multi-user.target
EOF
配置cri-docker.socket
官方文件地址:https://github.com/Mirantis/cri-dockerd/blob/master/packaging/systemd/cri-docker.socket
$ cat > /usr/lib/systemd/system/cri-docker.socket << EOF
[Unit]
Description=CRI Docker Socket for the API
PartOf=cri-docker.service

[Socket]
ListenStream=%t/cri-dockerd.sock
SocketMode=0660
SocketUser=root
SocketGroup=docker

[Install]
WantedBy=sockets.target
EOF
启动
$ systemctl enable --now cri-docker源码安装
部分操作系统有相关的安装包,如果有不支持的操作系统,可以使用源码安装:
安装go
$ wget https://go.dev/dl/go1.22.2.linux-amd64.tar.gz
$ tar -C /usr/local -zxf go1.22.2.linux-amd64.tar.gz

$ wget https://go.dev/dl/go1.22.2.linux-arm64.tar.gz
$ tar -C /usr/local -zxf go1.22.2.linux-arm64.tar.gz$ ls /usr/local/go
$ vi /etc/profile
export PATH:$PATH:/usr/local/go/bin克隆cri-dockerd
$ git clone https://github.com/Mirantis/cri-dockerd.git
$ cd cri-dockerd
$ ls
$ make cri-dockerd
$ ls
$ install -o root -g root -m 0755 cri-dockerd /usr/local/bin/cri-dockerd
$ install packaging/system/* /etc/systemd/system
$ sed -i -e 's,/usr/bin/cri-dockerd,/usr/local/bin/cri-dockerd,' /etc/systemd/system/cri-docker.service
$ chmod -x /etc/systemd/system/cri-docker.service
$ chmod -x /etc/systemd/system/cri-docker.socket
$ systemctl daemod-reload
$ systemctl enable --now cri-docker.socket
设置pause信息
$ vi /etc/systemd/system/cri-docker.service

# 修改ExecStart内容 添加--pod-infra-container-image
# [使用kubernetes社区容器镜像仓库]
ExecStart=/usr/bin/cri-dockerd --pod-infra-container-image=registry.k8s.io/pause:3.10 --container-runtime-endpoint fd://
# [使用阿里云容器镜像仓库]
ExecStart=/usr/bin/cri-dockerd --pod-infra-container-image=registry.aliyuncs.com/google_containers/pause:3.10 --container-runtime-endpoint fd://$ systemctl daemod-reloadPodman
这个还没有试验过
tar.gz安装
$ wget https://github.com/containers/podman/releases/download/v5.6.0-rc2/podman-remote-static-linux_amd64.tar.gz
$ wget https://github.com/containers/podman/releases/download/v5.6.0-rc2/podman-remote-static-linux_arm64.tar.gz

$ tar -zxf podman-remote-static-linux_amd64.tar.gz
$ tar -zxf podman-remote-static-linux_arm64.tar.gz

$ mv bin/podman-remote-static-linux_amd64 /usr/local/bin/podman
$ mv bin/podman-remote-static-linux_arm64 /usr/local/bin/podman
yum安装
$ yum install -y epel-release
$ yum install -y podman
仓库源
如果podman使用默认的仓库源,可能会pull不下来,所以需要修改仓库源。
由于podman不需要root权限,任何人都可以使用,所以每个人可以设置自己的源,就像环境变量一样,每人一个。
全局配置: /etc/containers/registries.conf
个人配置: ~/.config/containers/registries.conf
配置registries.conf:
# 未限定镜像搜索源:当Podman使用短名称(如nginx),Podman会按列表中的顺序依次尝试这些registry
unqualified-search-registries = ["docker.io", "registry.access.redhat.com"]

[[registry]]
prefix = "example.com/foo"            # 匹配的镜像前缀
insecure = false                      # 是否允许非HTTPS连接(是否允许使用HTTP或不验证TLS证书。)
blocked = false                       # 是否阻止该源(是否阻止拉取匹配的镜像)
location = "actual.registry.com/bar"  # 实际重定向地址(如果匹配了前缀,前缀会被替换成这个)

# 拉取镜像时按顺序尝试镜像站,最后尝试主站
[[registry.mirror]]
location = "docker.mirrors.ustc.edu.cn"
[[registry.mirror]]
location = "registry.docker-cn.com"
安装cri-o
下载与k8s同版本的cri-o
https://github.com/cri-o/cri-o/releases
# 下载
$ wget https://storage.googleapis.com/cri-o/artifacts/cri-o.amd64.v1.33.3.tar.gz
# 解压
$ tar -zxf cri-o.amd64.v1.33.3.tar.gz
# 进入目录
$ cd cri-o
# 执行安装 [根据提示创建对应目录,并再次执行安装命令直到没有错误提示]
$ ./install
# 修改/etc/crio/crio.conf.d/10-crio.conf在[crio.runtime]下添加
$ vi etc/crio/crio.conf.d/10-crio.conf
[crio.runtime]
cgroup_manager = "systemd"
启动
systemctl enable --now crio安装部署k8s
主要的master节点我的名称是liulike
添加yum源
注意v1.33可以替换成1.24+的对应版本
$ cat <<EOF | tee /etc/yum.repos.d/kubernetes.repo
[kubernetes]
name=Kubernetes
baseurl=https://mirrors.aliyun.com/kubernetes-new/core/stable/v1.33/rpm/
enabled=1
gpgcheck=1
gpgkey=https://mirrors.aliyun.com/kubernetes-new/core/stable/v1.33/rpm/repodata/repomd.xml.key
# exclude=kubelet kubeadm kubectl cri-tools kubernetes-cni
EOF
查看版本
$ yum --showduplicates list kubelet --nogpgcheck
$ yum --showduplicates list kubeadm --nogpgcheck
$ yum --showduplicates list kubectl --nogpgcheck
安装kubelet kubeadm kubectl
$ yum install -y kubelet kubeadm kubectl --disableexcludes=kubernetes --nogpgcheck容器运行时配置
高版本可以不用配置containerd,因为默认就是
containerd
# 修改配置文件开启SystemdCgroup
$ vi /etc/containerd/config.toml
# 修改
SystemdCgroup = false
# 为
SystemdCgroup = true

# 配置Kubelet使用containerd
$ vi /etc/sysconfig/kubelet
KUBELET_EXTRA_ARGS=--container-runtime=remote --container-runtime-endpoint=unix:///run/containerd/containerd.sock
Docker + cri-dockerd
# 配置Kubelet使用cri-dockerd
$ vi /etc/sysconfig/kubelet
KUBELET_EXTRA_ARGS=--container-runtime=remote --container-runtime-endpoint=unix:///run/cri-dockerd.sock
podman + cri-o
这个还没有试验过
# 配置Kubelet使用cri-dockerd
$ vi /etc/sysconfig/kubelet
KUBELET_EXTRA_ARGS=--container-runtime=remote --container-runtime-endpoint=unix:///run/crio/crio.sock
查看容器运行时
这里有两种类型的运行时,只是做为测试用,生产不建议使用不同的运行时
$ kubectl get nodes -o wide
NAME      STATUS   ROLES           AGE     VERSION      CONTAINER-RUNTIME
liulike   Ready    control-plane   5h19m   v1.33.3      containerd://1.7.28
node1     Ready    <none>          5h10m   v1.33.3      docker://28.3.3
启动kubelet
# 重新加载systemd配置
$ systemctl daemon-reload
# 启动kubelet
$ systemctl enable kubelet && systemctl start kubelet
查看k8s已安装的软件
$ yum list installed | grep kube准备镜像
$ kubeadm config images list --kubernetes-version=1.33.3
# 输出内容
registry.k8s.io/kube-apiserver:v1.33.3
registry.k8s.io/kube-controller-manager:v1.33.3
registry.k8s.io/kube-scheduler:v1.33.3
registry.k8s.io/kube-proxy:v1.33.3
registry.k8s.io/coredns/coredns:v1.12.0
registry.k8s.io/pause:3.10
registry.k8s.io/etcd:3.5.21-0
下载镜像
$ kubeadm config images pull --image-repository registry.aliyuncs.com/google_containers
# 输出示例:
[config/images] Pulled registry.aliyuncs.com/google_containers/kube-apiserver:v1.33.3
[config/images] Pulled registry.aliyuncs.com/google_containers/kube-controller-manager:v1.33.3
[config/images] Pulled registry.aliyuncs.com/google_containers/kube-scheduler:v1.33.3
[config/images] Pulled registry.aliyuncs.com/google_containers/kube-proxy:v1.33.3
[config/images] Pulled registry.aliyuncs.com/google_containers/coredns:v1.12.0
[config/images] Pulled registry.aliyuncs.com/google_containers/pause:3.10
[config/images] Pulled registry.aliyuncs.com/google_containers/etcd:3.5.21-0
master初始化
一个master节点执行
# kubeadm init --image-repository registry.aliyuncs.com/google_containers
$ kubeadm init --image-repository registry.aliyuncs.com/google_containers --kubernetes-version 1.33.3

# 执行示例
[init] Using Kubernetes version: v1.33.3
[preflight] Running pre-flight checks
        [WARNING SystemVerification]: cgroups v1 support is in maintenance mode, please migrate to cgroups v2
[preflight] Pulling images required for setting up a Kubernetes cluster
[preflight] This might take a minute or two, depending on the speed of your internet connection
[preflight] You can also perform this action beforehand using 'kubeadm config images pull'
W0808 20:21:52.738108    8876 checks.go:846] detected that the sandbox image "registry.k8s.io/pause:3.10" of the container runtime is inconsistent with that used by kubeadm.It is recommended to use "registry.aliyuncs.com/google_containers/pause:3.10" as the CRI sandbox image.
[certs] Using certificateDir folder "/etc/kubernetes/pki"
[certs] Generating "ca" certificate and key
[certs] Generating "apiserver" certificate and key
[certs] apiserver serving cert is signed for DNS names [kubernetes kubernetes.default kubernetes.default.svc kubernetes.default.svc.cluster.local liulike] and IPs [10.96.0.1 192.168.99.99]
[certs] Generating "apiserver-kubelet-client" certificate and key
[certs] Generating "front-proxy-ca" certificate and key
[certs] Generating "front-proxy-client" certificate and key
[certs] Generating "etcd/ca" certificate and key
[certs] Generating "etcd/server" certificate and key
[certs] etcd/server serving cert is signed for DNS names [liulike localhost] and IPs [192.168.99.99 127.0.0.1 ::1]
[certs] Generating "etcd/peer" certificate and key
[certs] etcd/peer serving cert is signed for DNS names [liulike localhost] and IPs [192.168.99.99 127.0.0.1 ::1]
[certs] Generating "etcd/healthcheck-client" certificate and key
[certs] Generating "apiserver-etcd-client" certificate and key
[certs] Generating "sa" key and public key
[kubeconfig] Using kubeconfig folder "/etc/kubernetes"
[kubeconfig] Writing "admin.conf" kubeconfig file
[kubeconfig] Writing "super-admin.conf" kubeconfig file
[kubeconfig] Writing "kubelet.conf" kubeconfig file
[kubeconfig] Writing "controller-manager.conf" kubeconfig file
[kubeconfig] Writing "scheduler.conf" kubeconfig file
[etcd] Creating static Pod manifest for local etcd in "/etc/kubernetes/manifests"
[control-plane] Using manifest folder "/etc/kubernetes/manifests"
[control-plane] Creating static Pod manifest for "kube-apiserver"
[control-plane] Creating static Pod manifest for "kube-controller-manager"
[control-plane] Creating static Pod manifest for "kube-scheduler"
[kubelet-start] Writing kubelet environment file with flags to file "/var/lib/kubelet/kubeadm-flags.env"
[kubelet-start] Writing kubelet configuration to file "/var/lib/kubelet/config.yaml"
[kubelet-start] Starting the kubelet
[wait-control-plane] Waiting for the kubelet to boot up the control plane as static Pods from directory "/etc/kubernetes/manifests"
[kubelet-check] Waiting for a healthy kubelet at http://127.0.0.1:10248/healthz. This can take up to 4m0s
[kubelet-check] The kubelet is healthy after 501.833759ms
[control-plane-check] Waiting for healthy control plane components. This can take up to 4m0s
[control-plane-check] Checking kube-apiserver at https://192.168.99.99:6443/livez
[control-plane-check] Checking kube-controller-manager at https://127.0.0.1:10257/healthz
[control-plane-check] Checking kube-scheduler at https://127.0.0.1:10259/livez
[control-plane-check] kube-controller-manager is healthy after 2m16.882056292s
[control-plane-check] kube-scheduler is healthy after 2m24.991498357s
[control-plane-check] kube-apiserver is healthy after 2m25.002263507s
[upload-config] Storing the configuration used in ConfigMap "kubeadm-config" in the "kube-system" Namespace
[kubelet] Creating a ConfigMap "kubelet-config" in namespace kube-system with the configuration for the kubelets in the cluster
[upload-certs] Skipping phase. Please see --upload-certs
[mark-control-plane] Marking the node liulike as control-plane by adding the labels: [node-role.kubernetes.io/control-plane node.kubernetes.io/exclude-from-external-load-balancers]
[mark-control-plane] Marking the node liulike as control-plane by adding the taints [node-role.kubernetes.io/control-plane:NoSchedule]
[bootstrap-token] Using token: r7e4k2.0foy9mph4d73rczn
[bootstrap-token] Configuring bootstrap tokens, cluster-info ConfigMap, RBAC Roles
[bootstrap-token] Configured RBAC rules to allow Node Bootstrap tokens to get nodes
[bootstrap-token] Configured RBAC rules to allow Node Bootstrap tokens to post CSRs in order for nodes to get long term certificate credentials
[bootstrap-token] Configured RBAC rules to allow the csrapprover controller automatically approve CSRs from a Node Bootstrap Token
[bootstrap-token] Configured RBAC rules to allow certificate rotation for all node client certificates in the cluster
[bootstrap-token] Creating the "cluster-info" ConfigMap in the "kube-public" namespace
[kubelet-finalize] Updating "/etc/kubernetes/kubelet.conf" to point to a rotatable kubelet client certificate and key
[addons] Applied essential addon: CoreDNS
[addons] Applied essential addon: kube-proxy

Your Kubernetes control-plane has initialized successfully!

To start using your cluster, you need to run the following as a regular user:

  mkdir -p $HOME/.kube
  sudo cp -i /etc/kubernetes/admin.conf $HOME/.kube/config
  sudo chown $(id -u):$(id -g) $HOME/.kube/config

Alternatively, if you are the root user, you can run:

  export KUBECONFIG=/etc/kubernetes/admin.conf

You should now deploy a pod network to the cluster.
Run "kubectl apply -f [podnetwork].yaml" with one of the options listed at:
  https://kubernetes.io/docs/concepts/cluster-administration/addons/

Then you can join any number of worker nodes by running the following on each as root:

kubeadm join 192.168.99.99:6443 --token r7e4k2.0foy9mph4d73rczn \
        --discovery-token-ca-cert-hash sha256:ee8bf80b66fff11904f588e28292ab4eaeec4a4adee186753892585edc2de232
初始化完成后,master节点执行
$ mkdir -p $HOME/.kube
$ cp -i /etc/kubernetes/admin.conf $HOME/.kube/config
$ chown $(id -u):$(id -g) $HOME/.kube/config
# 添加到~/.bash_profile
$ vi ~/.bash_profile
export KUBECONFIG=/etc/kubernetes/admin.conf

# 此时查看节点是NotReady状态,需要添加网络插件
$ kubectl get nodes
NAME      STATUS     ROLES           AGE     VERSION
liulike   NotReady   control-plane   2m26s   v1.33.3
master节点加入
前置没有kubeadm残留
bash# 停止kubelet $ systemctl stop kubelet # 清理kubeadm残留的文件 $ kubeadm reset -f 清理残留文件 $ rm -rf /etc/kubernetes/ $ rm -rf /var/lib/kubelet/ $ rm -rf $HOME/.kube
如果集群初始化时没有设置controlPlaneEndpoint,需要更新集群配置
多master集群需要配置稳定的 controlPlaneEndpoint,哪怕它实际是单节点不稳定
$ kubectl -n kube-system edit cm kubeadm-config

apiVersion: v1
data:
  ClusterConfiguration: |
    ...
    kubernetesVersion: v1.33.3
    controlPlaneEndpoint: 192.168.99.99:6443    # 添加controlPlaneEndpoint,生产环境建议使用nginx或HAProxy或云负载均衡器对kube-apiserver、etcd 做高可用
    ...
添加节点
# 1. 创建新令牌(有效期 24 小时,默认)
$ kubeadm token create --print-join-command
# 示例输出:
kubeadm join 192.168.99.99:6443 --token 7inb7m.itrc3y7e7ln5q2mg --discovery-token-ca-cert-hash sha256:ee8bf80b66fff11904f588e28292ab4eaeec4a4adee186753892585edc2de232


# 2. 获取证书密钥(若已过期需重新生成)
$ kubeadm init phase upload-certs --upload-certs
# 输出示例:
[upload-certs] Storing the certificates in Secret "kubeadm-certs" in the "kube-system" Namespace
[upload-certs] Using certificate key:
5683f509265ad3ebdb21b413317fa9a980815b23b1209f8c74bb23c67049c761


# 3. 获取 CA 证书哈希值(若未显示在 token create 中)
$ openssl x509 -pubkey -in /etc/kubernetes/pki/ca.crt | openssl rsa -pubin -outform der 2>/dev/null | openssl dgst -sha256 -hex | sed 's/^.* //'
# 输出示例:
ee8bf80b66fff11904f588e28292ab4eaeec4a4adee186753892585edc2de232

# 使用上面3步的信息拼接命令:
$ kubeadm join <负载均衡器IP>:6443 \
  --token <新令牌> \
  --discovery-token-ca-cert-hash sha256:<CA证书哈希值> \
  --control-plane \
  --certificate-key <证书密钥>
# 拼接示例:
$ kubeadm join 192.168.99.99:6443 \
  --token 7inb7m.itrc3y7e7ln5q2mg \
  --discovery-token-ca-cert-hash sha256:ee8bf80b66fff11904f588e28292ab4eaeec4a4adee186753892585edc2de232 \
  --control-plane \
  --certificate-key 5683f509265ad3ebdb21b413317fa9a980815b23b1209f8c74bb23c67049c761

# 示例输出:
[root@node1 ~]# kubeadm join 192.168.99.99:6443   --token 7inb7m.itrc3y7e7ln5q2mg   --discovery-token-ca-cert-hash sha256:ee8bf80b66fff11904f588e28292ab4eaeec4a4adee186753892585edc2de232   --control-plane   --certificate-key 5683f509265ad3ebdb21b413317fa9a980815b23b1209f8c74bb23c67049c761
[preflight] Running pre-flight checks
        [WARNING SystemVerification]: cgroups v1 support is in maintenance mode, please migrate to cgroups v2
[preflight] Reading configuration from the "kubeadm-config" ConfigMap in namespace "kube-system"...
[preflight] Use 'kubeadm init phase upload-config --config your-config-file' to re-upload it.
[preflight] Running pre-flight checks before initializing the new control plane instance
[preflight] Pulling images required for setting up a Kubernetes cluster
[preflight] This might take a minute or two, depending on the speed of your internet connection
[preflight] You can also perform this action beforehand using 'kubeadm config images pull'
W0808 22:04:33.436014   28086 checks.go:846] detected that the sandbox image "registry.k8s.io/pause:3.10" of the container runtime is inconsistent with that used by kubeadm.It is recommended to use "registry.aliyuncs.com/google_containers/pause:3.10" as the CRI sandbox image.
[download-certs] Downloading the certificates in Secret "kubeadm-certs" in the "kube-system" Namespace
[download-certs] Saving the certificates to the folder: "/etc/kubernetes/pki"
[certs] Using certificateDir folder "/etc/kubernetes/pki"
[certs] Generating "front-proxy-client" certificate and key
[certs] Generating "etcd/peer" certificate and key
[certs] etcd/peer serving cert is signed for DNS names [localhost node1] and IPs [192.168.99.98 127.0.0.1 ::1]
[certs] Generating "etcd/server" certificate and key
[certs] etcd/server serving cert is signed for DNS names [localhost node1] and IPs [192.168.99.98 127.0.0.1 ::1]
[certs] Generating "etcd/healthcheck-client" certificate and key
[certs] Generating "apiserver-etcd-client" certificate and key
[certs] Generating "apiserver-kubelet-client" certificate and key
[certs] Generating "apiserver" certificate and key
[certs] apiserver serving cert is signed for DNS names [kubernetes kubernetes.default kubernetes.default.svc kubernetes.default.svc.cluster.local node1] and IPs [10.96.0.1 192.168.99.98 192.168.99.99]
[certs] Valid certificates and keys now exist in "/etc/kubernetes/pki"
[certs] Using the existing "sa" key
[kubeconfig] Generating kubeconfig files
[kubeconfig] Using kubeconfig folder "/etc/kubernetes"
[kubeconfig] Writing "admin.conf" kubeconfig file
[kubeconfig] Writing "controller-manager.conf" kubeconfig file
[kubeconfig] Writing "scheduler.conf" kubeconfig file
[control-plane] Using manifest folder "/etc/kubernetes/manifests"
[control-plane] Creating static Pod manifest for "kube-apiserver"
[control-plane] Creating static Pod manifest for "kube-controller-manager"
[control-plane] Creating static Pod manifest for "kube-scheduler"
[check-etcd] Checking that the etcd cluster is healthy
[kubelet-start] Writing kubelet configuration to file "/var/lib/kubelet/config.yaml"
[kubelet-start] Writing kubelet environment file with flags to file "/var/lib/kubelet/kubeadm-flags.env"
[kubelet-start] Starting the kubelet
[etcd] Announced new etcd member joining to the existing etcd cluster
[etcd] Creating static Pod manifest for "etcd"
{"level":"warn","ts":"2025-08-08T22:04:34.709455+0800","logger":"etcd-client","caller":"v3@v3.5.21/retry_interceptor.go:63","msg":"retrying of unary invoker failed","target":"etcd-endpoints://0xc0005525a0/192.168.99.99:2379","attempt":0,"error":"rpc error: code = FailedPrecondition desc = etcdserver: can only promote a learner member which is in sync with leader"}
{"level":"warn","ts":"2025-08-08T22:04:35.204404+0800","logger":"etcd-client","caller":"v3@v3.5.21/retry_interceptor.go:63","msg":"retrying of unary invoker failed","target":"etcd-endpoints://0xc0005525a0/192.168.99.99:2379","attempt":0,"error":"rpc error: code = FailedPrecondition desc = etcdserver: can only promote a learner member which is in sync with leader"}
{"level":"warn","ts":"2025-08-08T22:04:35.707202+0800","logger":"etcd-client","caller":"v3@v3.5.21/retry_interceptor.go:63","msg":"retrying of unary invoker failed","target":"etcd-endpoints://0xc0005525a0/192.168.99.99:2379","attempt":0,"error":"rpc error: code = FailedPrecondition desc = etcdserver: can only promote a learner member which is in sync with leader"}
[etcd] Waiting for the new etcd member to join the cluster. This can take up to 40s
[kubelet-check] Waiting for a healthy kubelet at http://127.0.0.1:10248/healthz. This can take up to 4m0s
[kubelet-check] The kubelet is healthy after 2.814319ms
[kubelet-start] Waiting for the kubelet to perform the TLS Bootstrap
[mark-control-plane] Marking the node node1 as control-plane by adding the labels: [node-role.kubernetes.io/control-plane node.kubernetes.io/exclude-from-external-load-balancers]
[mark-control-plane] Marking the node node1 as control-plane by adding the taints [node-role.kubernetes.io/control-plane:NoSchedule]
[control-plane-check] Waiting for healthy control plane components. This can take up to 4m0s
[control-plane-check] Checking kube-apiserver at https://192.168.99.98:6443/livez
[control-plane-check] Checking kube-controller-manager at https://127.0.0.1:10257/healthz
[control-plane-check] Checking kube-scheduler at https://127.0.0.1:10259/livez
[control-plane-check] kube-apiserver is healthy after 3.62061ms
[control-plane-check] kube-controller-manager is healthy after 4.073707ms
[control-plane-check] kube-scheduler is healthy after 5.081712ms

This node has joined the cluster and a new control plane instance was created:

* Certificate signing request was sent to apiserver and approval was received.
* The Kubelet was informed of the new secure connection details.
* Control plane label and taint were applied to the new node.
* The Kubernetes control plane instances scaled up.
* A new etcd member was added to the local/stacked etcd cluster.

To start administering your cluster from this node, you need to run the following as a regular user:

        mkdir -p $HOME/.kube
        sudo cp -i /etc/kubernetes/admin.conf $HOME/.kube/config
        sudo chown $(id -u):$(id -g) $HOME/.kube/config

Run 'kubectl get nodes' to see this node join the cluster.
像第一个master那样执行对应命令即可
$ mkdir -p $HOME/.kube
$ cp -i /etc/kubernetes/admin.conf $HOME/.kube/config
$ chown $(id -u):$(id -g) $HOME/.kube/config
# 添加到~/.bash_profile
$ vi ~/.bash_profile
export KUBECONFIG=/etc/kubernetes/admin.conf
其他工作节点加入
$ kubeadm join 192.168.99.99:6443 --token r7e4k2.0foy9mph4d73rczn \
        --discovery-token-ca-cert-hash sha256:ee8bf80b66fff11904f588e28292ab4eaeec4a4adee186753892585edc2de232

# 如果过期可以用一下命令获取
$ kubeadm token create --print-join-command
删除节点
# master节点执行
# 从集群元数据中删除节点
$ kubectl delete node xxx # xxx 表示要删除的节点名称
# 此时查看节点节点已经不存在了
$ kubectl get nodes

# 在对应节点执行
# 重置 kubeadm 配置(清除节点状态)
$ kubeadm reset -f
# 清理网络插件
$ rm -rf /etc/cni/net.d
$ systemctl stop kubelet
$ systemctl disable kubelet
k8s命令补全工具
需要bash4.3+
# 安装
$ yum -y install bash-completion
# 启用kubectl自动补全
$ echo 'source <(kubectl completion bash)' >> ~/.bashrc
$ cat ~/.bashrc
$ source ~/.bashrc
CNI网络插件
CNI网络插件没有装的话,可能出现,k8s网络组件已经运行了,但是查看节点还是NotReady状态
如果遇到安装了CNI插件和网路组件(如Calico),对应节点还是NotReady状态,尝试重启该节点一般都可以解决
# cni网络配置
# cni插件下载地址:https://github.com/containernetworking/plugins/releases

$ wget https://github.com/containernetworking/plugins/releases/download/v1.7.1/cni-plugins-linux-amd64-v1.7.1.tgz
$ wget https://github.com/containernetworking/plugins/releases/download/v1.7.1/cni-plugins-linux-arm-v1.7.1.tgz

# 解压到/opt/cni/bin
$ tar -zxf cni-plugins-linux-amd64-v1.7.1.tgz -C /opt/cni/bin
k8s集群配置网络
配置Calico
# 下载
$ wget --no-check-certificate https://raw.githubusercontent.com/projectcalico/calico/v3.26.4/manifests/calico.yaml
# 修改 在:
# Cluster type to identify the deployment type
- name: CLUSTER_TYPE
  value: "k8s,bgp"
# 下方添加
- name: AUTODETECTION_METHOD
  value: "interface=ens33"     # 此项通过ip addr 或 ip addr list 查看

# 去掉注释:
# - name: CALICO_IPV4POOL_CIDR
#   value: "192.168.0.0/16"    # 这个值改成10.244.0.0/16
准备镜像
$ ctr -n k8s.io image pull docker.io/calico/kube-controllers:v3.26.4
$ ctr -n k8s.io image pull docker.io/calico/cni:v3.26.4
$ ctr -n k8s.io image pull docker.io/calico/node:v3.26.4

# 拉取不下来可以尝试以下方式

$ ctr -n k8s.io image pull swr.cn-north-4.myhuaweicloud.com/ddn-k8s/docker.io/calico/kube-controllers:v3.26.4
$ ctr -n k8s.io image tag swr.cn-north-4.myhuaweicloud.com/ddn-k8s/docker.io/calico/kube-controllers:v3.26.4 docker.io/calico/kube-controllers:v3.26.4

$ ctr -n k8s.io image pull swr.cn-north-4.myhuaweicloud.com/ddn-k8s/docker.io/calico/cni:v3.26.4
$ ctr -n k8s.io image tag swr.cn-north-4.myhuaweicloud.com/ddn-k8s/docker.io/calico/cni:v3.26.4 docker.io/calico/cni:v3.26.4

$ ctr -n k8s.io image pull swr.cn-north-4.myhuaweicloud.com/ddn-k8s/docker.io/calico/node:v3.26.4
$ ctr -n k8s.io image tag swr.cn-north-4.myhuaweicloud.com/ddn-k8s/docker.io/calico/node:v3.26.4 docker.io/calico/node:v3.26.4
部署
$ kubectl apply -f calico.yaml部署完成后查看网络
$ kubectl get pods --all-namespaces
NAMESPACE     NAME                                      READY   STATUS    RESTARTS   AGE
kube-system   calico-kube-controllers-9c5475f64-hnwd9   1/1     Running   0          8m16s
kube-system   calico-node-jwls5                         1/1     Running   0          5m47s
kube-system   coredns-757cc6c8f8-t62z6                  1/1     Running   0          38m
kube-system   coredns-757cc6c8f8-wpnmg                  1/1     Running   0          38m
kube-system   etcd-liulike                              1/1     Running   0          39m
kube-system   kube-apiserver-liulike                    1/1     Running   0          39m
kube-system   kube-controller-manager-liulike           1/1     Running   0          39m
kube-system   kube-proxy-tjdhb                          1/1     Running   0          38m
kube-system   kube-scheduler-liulike                    1/1     Running   0          39m
常用命令
# 查看节点
$ kubectl get nodes -o wide
# 查看所有pod (-o wide 表示详细信息)
$ kubectl get pods --all-namespaces -o wide
# 如果出现错误可以重置初始化
$ kubeadm reset

# 去掉master污点   xxx 表示节点名称
$ kubectl describe node xxx | grep -i taint  # 查看污点
$ kubectl taint nodes xxx node-role.kubernetes.io/control-plane:NoSchedule- # 去掉污点

# 更多自己百度