Appearance
ES未授权访问漏洞处理
Nginx+防火墙方式
此方式整体侵入性比较小,对于ES的修改来说只是调整了端口,如果应用侧方便修改甚至可以不修改ES的端口,只修改应用侧的配置即可
安装Nginx
bash
yum install -y ./nginx-1.26.1-2.el7.ngx.x86_64.rpm编辑nginx配置文件
bash
$ mv /etc/nginx/conf.d/default.conf /etc/nginx/conf.d/elasticsearch.conf
$ vi /etc/nginx/conf.d/elasticsearch.conf
elasticsearch.conf内容调整:
ES大部分请求都是http请求,所以对请求拦截转发即可
nginx
server {
listen 8200;
server_name xxx.xxx.xxx.101; # 监听端口
# 调整大小限制
client_max_body_size 500M;
client_body_buffer_size 100M;
# IP 白名单
include /etc/nginx/conf.d/whitelist/white_list.conf;
location / {
proxy_pass http://xxx.xxx.xxx.101:9200; # 代理到端口[127.0.0.1需要进行测试,有时候可能不行]
proxy_http_version 1.1;
# 超时
proxy_read_timeout 7200s;
proxy_send_timeout 7200s;
# 头信息传递
proxy_set_header HOST $host;
proxy_set_header X-Real-IP $remote_addr;
proxy_set_header X-Forwarded-For $proxy_add_x_forwarded_for;
proxy_set_header X-Forwarded-Proto $scheme;
# 连接优化
proxy_set_header Connection "";
chunked_transfer_encoding off;
}
error_page 403 @return403;
location @return403 {
add_header Content-Type 'application/json;charset=utf-8';
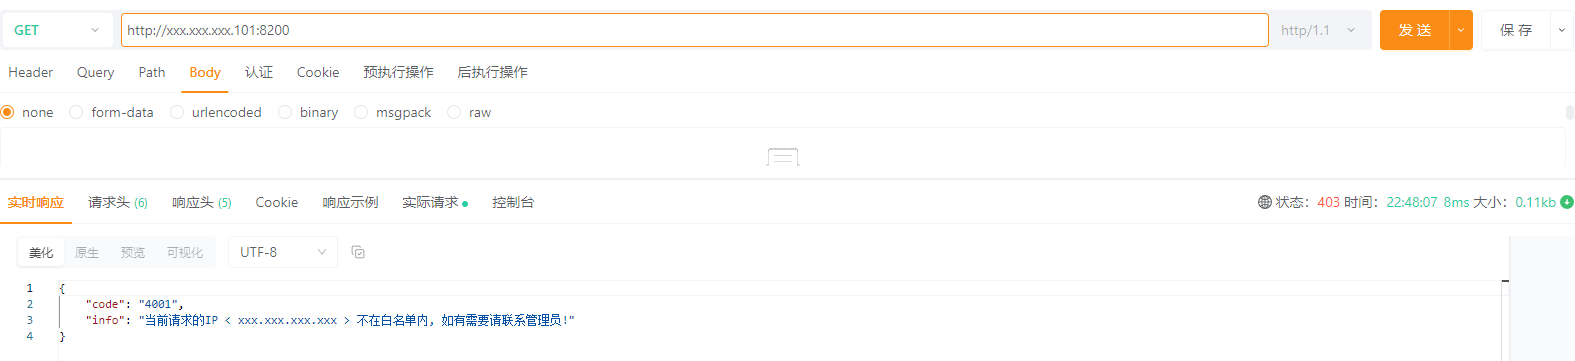
return 200 '{"code":"4001", "info":"当前请求的IP < $remote_addr > 不在白名单内, 如有需要请联系管理员!"}';
}
}/etc/nginx/conf.d/whitelist/white_list.conf内容:
nginx
# IP 白名单
allow xxx.xxx.xxx.xxx;
allow xxx.xxx.xxx.0/24;

deny all;
/etc/nginx/nginx.conf新增内容:
针对Transport协议的流量直接通过四层代理处理
nginx
# 与http同一级
stream {
	upstream es_transport {
		server xxx.xxx.xxx.101:9300;
	}

	server {
		listen 8300;
		# IP 白名单
		include /etc/nginx/conf.d/whitelist/white_list.conf;
		proxy_connect_timeout 60000000;
		proxy_timeout 60000000;
		proxy_pass es_transport;
	}
}

http {
	...
    include /etc/nginx/conf.d/*.conf;
}
调整ES配置
由于背景为不确定多少应用需要修改配置,所以对ES做修改,修改的原因是让Nginx来代理此端口做白名单
bash
$ vi elasticsearch.yml
# 调整:
http.port: 8200
transport.tcp.port: 8300
# 为:
http.port: 9200
transport.tcp.port: 9300

# 调整后重启ES
启动Nginx
bash
$ systemctl start nginx
$ systemctl enable nginx
启动防火墙
bash
$ systemctl start firewalld
$ systemctl enable firewalld
bash
# 添加防火墙允许端口
$ firewall-cmd --permanent --add-port=8200/udp
$ firewall-cmd --permanent --add-port=8200/tcp
$ firewall-cmd --permanent --add-port=8300/udp
$ firewall-cmd --permanent --add-port=8300/tcp
# 可选ssh的[生产环境的ssh端口不是默认的]
$ firewall-cmd --permanent --add-port=22222/udp
$ firewall-cmd --permanent --add-port=22222/tcp
$ firewall-cmd --permanent --add-service=ssh
# 设置ES节点放行所有端口允许访问
$ firewall-cmd --permanent --add-rich-rule='rule family="ipv4" source address="xxx.xxx.xxx.101" accept'
$ firewall-cmd --permanent --add-rich-rule='rule family="ipv4" source address="xxx.xxx.xxx.102" accept'
$ firewall-cmd --permanent --add-rich-rule='rule family="ipv4" source address="xxx.xxx.xxx.103" accept'
# 重载配置或重启
$ firewall-cmd --reload
$ systemctl restart firewalld
效果
其他方式
如 添加插件、通过iptables或安全组(云服务器)等方式,这里暂时不记录,PS: 主要是没有尝试过